photo navbar-headerpic.jpgPhotobucketPhotobucketPhotobucketPhotobucketPhotobucketPhotobucketPhotobucket
Showing posts with label Paint. Show all posts

Living Room Reveal

This room is the first room that you see when you enter my home. It has seen a lot of changes over the past 3 years, but as of today, this is how it sits. I have been planning, plotting, window shopping and designing this room (and the rest of the house) for years and I'm very pleased with the end results. Who am I kidding? This is the "for now" reveal. Enjoy!

Before 

Stripes

IMG_1710

IMG_1705

IMG_1706

IMG_1704

IMG_1714

IMG_1708    
    IMG_1713

IMG_1730

IMG_1718

IMG_1723

IMG_1737 

IMG_1701

So there it is. My front living room from the day we moved in 3 years ago, to today. It was the first room in my house to be “done” and I love it. Sometimes when the rest of my house is a lot little chaotic, I come in here to just sit and relax. It is the one room in the house that I know will always be clean. It’s not too
shabby to look at either. Check back for more peaks inside my home.

Source list coming soon!


Something Old

I have had this file cabinet finished and in use for a looooooong time now. Apparently I never got around to blogging about it. It was my way of diving in to the chevron craze. Anywho. . . here's the Before, process and After in pictures.


Here she is. Isn't she purdy!?! Or not. 


Primed the sucker after I cleaned it really well.


I cut out a chevron pattern that I found online and taped it to the top. (it would probably have been waaaay easier to cut vinyl and use that, but I don't have a vinyl cutter. sad.)


I can't seem to find a TRUE After photo. Ya know, the one where I touched it up, added hardware and made it look fabulous. Yeah. That one. Anywho. I added some shiny chrome handles by Martha Stewart via Home Depot and it added just the right touch. The reason I finally got around to posting about it is because I'm in the works of replacing it with something old and beautiful! We'll see how it all pans out.

HELP!

So I need some help. I've finally received permission to paint the cabinets in my kitchen. Yes permission. This is a huge improvement from when we moved in. "Your painting the wood in this house over my dead body." Remember this post? So. HUGE milestone for The Hubs. Anywho. WHAT COLOR!?! My initial reaction is the obvious choice. White. My major hesitation? My pink counters. Have a look.
(don't judge. this is before we moved in. hadn't painted or replaced flooring yet.)


 See my problem? Right now they aren't THAT noticeable. If I paint the cabinets, however, they'll stand out like a nun in a bar. Because the kitchen is the LAST thing on our Honey-Do list, replacing them isn't an option yet. We'll do that when we can renovate the whole kitchen. So. Do I embrace them and go with white? Leave them cause it's better that they don't stand out? Do something like grey or a color? I need help.

Remember When

Remember that one time . . .? This seems to be a quote that The Hubs and I use a lot. We generally don’t use it years down the road, but immediately after something really funny, sad, random or even ridiculously crazy happens. Example. “Hey hun, remember that one time we bet my curtains on our March Madness Brackets because you hated the curtains and you lost!?!” That’s what I said to him as soon as I found out my bracket kicked his bracket’s trash and I got to keep my curtains that I love. hehe. Anywho. . . Remember that one time I showed you this picture

DSCN1795

and then nothing happened with it? Well, something happened with it. Here’s what.

DSCN2290

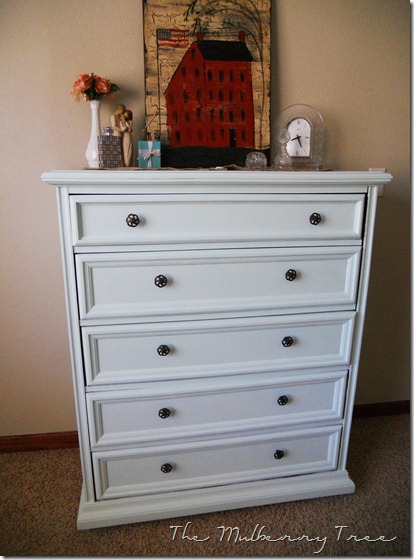
So here’s the story with this dresser. My in laws live in a nicer neighborhood than we do. To be expected right? Well with said nicer neighborhood, comes nicer bulk trash. Can you see where I’m going with this? Well one day I was driving to their house and spotted this dresser on the side of the road. Surely they can’t be getting rid of that dresser! Who would put that dresser out on the curb for the garbage man to haul away with his backhoe and giant garbage crushing truck!?! Someone with nicer things than me that considers and vintage Lane dresser with it’s beautiful dovetail drawers and solid wood construction, garbage. That’s who! So while The Hubs was away, I borrowed his sexy truck and enlisted the help of my amazing SIL. We made sure the owners were in fact planning on getting rid of it and loaded it up. The knobs were falling apart and one of the drawers was missing it’s track so it just hung out in the drawer compartment but still works. I LOVE it. And it turned out so pretty too! It’s fabulous what some paint, new knobs and some wood filler will do for such a sad dresser. Here are a few more before and after photos.

DSCN1793DSCN2289
DSCN1794DSCN2291

You may have also noticed that I have painted the walls as well. They were baby blue. (supposed to be grey originally but it came out blue) So I finally forked out the money to buy my favorite greige (BM Edgecomb Gray) and painted while The Hubs was away one Saturday. It made a HUGE difference as well.

DSCN2298
DSCN2288

I know it’s hard to tell, but it’s not white. If you read yesterday’s post about my mint green lamps, THAT is what color the dresser is. For whatever reason, I wasn’t able to get the color to translate into pictures. Oh well. I love it. My 3 y/o loves it and The Hubs said it looks nice. Win. Win. Win. Guess what. It's bulk trash there again this week. The Hubs should be afraid. VERY afraid.

Linked up @
Creative Itch
Primitive and ProperPhotobucket

Another Lovely Herringbone Paint Job

I just HAD to share this herringbone wall from Design Build Love. It is completely FAB and another great herringbone wall to add to my Design Inspirations. 


It's amazing how much impact a lil paint can have.
I've been trying to decide what to hang on the walls in my new craft room. I've got a few things in mind, but when I talked to my sis about it, she told me about this fabulous thread holder that she pinned from Craptastic.
First of all, I have to say that I LOVE the blog name; CRAPTASTIC. I mean that's friggin awesome. hehe.
Anywho, here's the project.


Notice the shape of the nails? It's an "H". So cute.


What a terrific idea. Plywood and some nails? Who doesn't have those things laying around? I know I do and I'm sure gonna have one of these. On top of functionality, it has limitless possibilities for the design. It could be cut into any shape and painted or stained with any color or design. Get craftin!

FINALLY! A Reveal!

I've been busy busy lately, but finally feel like something is finished. While the Hubs was out of town on a business trip, I got the itch to paint stripes. . . So I did. This little cove was the perfect place for it. Not too much wall, but you see it right when you walk into the house so it has a big impact. I couldn't be happier!


A laser level is a MUST when you're trying to put the tape on the wall. Without it, your tape WILL NOT be straight! I found this handy one that just tacks onto the wall.
TIP: (I hope this makes sense) For the stripe you will be painting, measure on the INSIDE of the tape to get the correct height of the stripe. For the stripe you WILL NOT be painting: measure from the INSIDE of the tape on the painted stripe, and place the level. Then put the tape BELOW the laser line. The non painted stripes should look way smaller than the ones you'll paint. It also helps to mark the ones you'll be painting before you start so you don't accidentally start painting the wrong one. 


Then Paint Away!


I learned really quickly that paint dries A LOT faster in AZ than any other state that I've lived in. It's so dry here that it sucks the moisture out. No big deal? It is a big deal. You have to peel the tape off almost immediately after you apply the final coat of paint or the tape will peel off your paint. 


I LOVE, LOVE, LOVE my wall. Now I just need a lil somthin to house the printer and tower to free up some desk top space. 


Happy Wednesday!


Linked up with 

Round Table: After

I finally finished the round table project. It ended up being a little bit trickier than my original plan. (2 coats of spray paint) When I went to pick up the table, it was HUGE!!! Like table for a little patio set huge. Maybe not THAT big, but it was at least twice as big a round as I was expecting. For 10 bucks though, it was still a great deal. As I was putting it in my car I thought, man this would fit better if it were cut in half! There it was! I'm going to cut it in half and have a table for BOTH boys!! Pure genius! I've seen this done a few places, but here's inspiration from a fav blog of mine, Gus and Lula.


Both the desk, and her floating shelves in her foyer started out as on table and were made into these beauties. 

Remember the "Before"


Here is what I turned it into. . .

The green on this one ended up being a bit more neon than apple like the monsters on the bed. So it'll stay neon until I can find the right apple green.


I simply attached a small "L" bracket to each table that I then screwed into the wall. I LOVE how they turned out and more importantly, both boys LOVE having their own table. I'm still working on accessories, so don't judge too harshly. I'm getting there!