photo navbar-headerpic.jpgPhotobucketPhotobucketPhotobucketPhotobucketPhotobucketPhotobucketPhotobucket
Showing posts with label Tutorials. Show all posts

Sewing Jar

I’ve been seeing these little jars all over blogland and while sewing last night I decided to make one. Found some scrap fabric, stuffing, glue gun and scissors. Here’s how I did it in pictures. (If you have any specific questions just let me know.) It was super easy and I already love the new addition to my lil craft room.

DSCN1855
DSCN1857
DSCN1858
DSCN1860
DSCN1870
DSCN1872
DSCN1874
DSCN1892
DSCN1888


Fill it with button and some thread, stick a few needles in the top and viola! You have a new sewing jar that is portable nonetheless! The best part is that you can customize it to match your space. Now get cracking and make a jar for yourself!
Linking up @

PhotobucketTip Junkie handmade projects

Debbie Does Creations


I've been trying to decide what to hang on the walls in my new craft room. I've got a few things in mind, but when I talked to my sis about it, she told me about this fabulous thread holder that she pinned from Craptastic.
First of all, I have to say that I LOVE the blog name; CRAPTASTIC. I mean that's friggin awesome. hehe.
Anywho, here's the project.


Notice the shape of the nails? It's an "H". So cute.


What a terrific idea. Plywood and some nails? Who doesn't have those things laying around? I know I do and I'm sure gonna have one of these. On top of functionality, it has limitless possibilities for the design. It could be cut into any shape and painted or stained with any color or design. Get craftin!

FINALLY! A Reveal!

I've been busy busy lately, but finally feel like something is finished. While the Hubs was out of town on a business trip, I got the itch to paint stripes. . . So I did. This little cove was the perfect place for it. Not too much wall, but you see it right when you walk into the house so it has a big impact. I couldn't be happier!


A laser level is a MUST when you're trying to put the tape on the wall. Without it, your tape WILL NOT be straight! I found this handy one that just tacks onto the wall.
TIP: (I hope this makes sense) For the stripe you will be painting, measure on the INSIDE of the tape to get the correct height of the stripe. For the stripe you WILL NOT be painting: measure from the INSIDE of the tape on the painted stripe, and place the level. Then put the tape BELOW the laser line. The non painted stripes should look way smaller than the ones you'll paint. It also helps to mark the ones you'll be painting before you start so you don't accidentally start painting the wrong one. 


Then Paint Away!


I learned really quickly that paint dries A LOT faster in AZ than any other state that I've lived in. It's so dry here that it sucks the moisture out. No big deal? It is a big deal. You have to peel the tape off almost immediately after you apply the final coat of paint or the tape will peel off your paint. 


I LOVE, LOVE, LOVE my wall. Now I just need a lil somthin to house the printer and tower to free up some desk top space. 


Happy Wednesday!


Linked up with 

Nightstand


It's been a while since I've been able to complete a project with moving and then moving again. For the Hubs' B-Day I decided to start and complete an entire project in a week. The difficult thing was not being able to do it at home because he would see it. So off to my Grandma's patio I went. with the boys in toe, of course
A while back I saw a B.E.A.UTIFUL nightstand at
It's a phenomenal transformation that I had to be a part of. I did most everything the same, including ordering the pulls from Canada because they were way more expensive via U.S. shop, which was TOTALLY worth it. I love how it turned out. I did, however, use a Dark Walnut stain instead of a medium grade stain like she did. Truth be told-I preferred the color that she used, but wasn't able to find it. I tried one that I thought would be similar and it turned out almost clear. Then I decided to try the Dark Walnut I already had. It looked great on the first side. Only problem was that the pine of the nightstand soaked the stain so quickly that it was darker on the remaining sides and I just had to go with it. Overall, I'm pleased with the result and the Hubs loves having a nightstand again since I stole his
After I get more done in my Master, I'll work on getting better staged pictures. 


I hope you enjoyed stopping by for a look
Under My Mulberry Tree

Nightstand-Ikea
Stain-Minwax, Dark Walnut
Paint-Benjamin Moore, Chantilly Lace


Linked up at 


Back-Alley Hack Job T


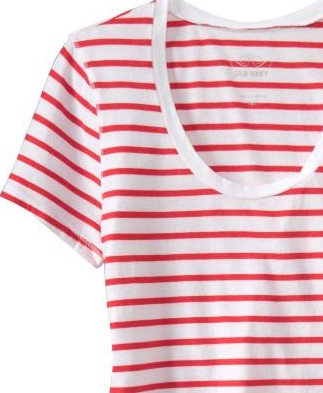
I didn't wait long until I decided to try my hand at altering my red and white stripe T that I scored at Old Navy. Here's an almost step by step Tutorial of how I did it. I couldn't find my regular camera so I just used my cell. Sorry for the poor quality of pictures.


I started by laying the shirt out on my cardboard cutting thing. Make sure it is completely flat. No wrinkles, front or back.


This white T is one that I know fits, so I used it as a template. (totally a "back-alley hack job" approach but it was all I could think of) I traced around the white T leaving about 1/4" in either side for sewing room. Then I simply cut it out. Just up the sides and made sure the top of the side still met the arm in the corner So that I didn't have to stitch the arm hole as well.


Next, I folded the T in half to make sure both sides had the same silhouette. Then I pinned each side and sewed along the edge. Because I don't have a serger (which I know I desperately need) I simply ran a straight stitch twice in an attempt to strengthen the seam. (I'll let you know if it falls apart later)


I'm not sure why I did this next part, but I started it so I decided to finish it. I had removed the bottom hem because the shirt was way too long, as you can see in the picture with the 2 shirts layered on top of each other. Then I decided that I wanted it back on there because their hem would be way better than mine. I pinned this upside down on the outside of the shirt and sewed it back on, flipped it down so that the seam wasn't visible and ironed the hem in place. 

 The shirt was now the right length for what I wanted and the right width. 
I added a yellow scarf for color and this is what I have.

Not too shabby if you ask me. I hope that made sense in some universe. Good luck with your sewing adventures!

That's how you alter a $4.97 t shirt from where I sit,
Under My Mulberry Tree

The Stuffed Owl

I started this project for my new niece Lilly. She is a month old and has been in the hospital since birth with complications. Because WE can't be there with her we wanted something that could sit by her side on our behalf. Thus, The Owl.

I found these great fabrics at Hobby Lobby and had to bring them home for the owl. I chose a minky dot fabric because it is so soft and will be soothing to the touch. The floral fabric had great colors that I couldn't pass up. I already had the muslin in my fabric box.

First I folded the minky in half with the soft side facing in.
Then I made an outline of what I wanted to owl to be. You could probably find a picture online that would work as a template. I wanted mine to have a more homemade look so I freehanded it.
Next I cut out the 2 sides together so they would be the same shape. (If you found a stencil or template you can do them 1 at a time. I didn't trust my hands to draw it the same twice.)
The eyes are a 2 part process.
1. I cut small inch wide strips of the muslin. On one side I did a basting stitch all the way to the end and pulled it tight. By doing this I was able to connect the small ends to each other creating a circle.
2. Place the button on top of the muslin circle and sew it where you want the eye to be.
(If you aren't a sewer you can simply glue the circle to the minky body and then glue the button on top of that)

This is what the eyes look like up-close. I took a liquid stitch to the edges so that they won't unravel anymore than they already have. I didn't fold around the edge and make a seam because, again, I wanted a more homemade look.
The feet I cut out freehand. You can draw them or find some to trace. Then I just did a simple stitch around the perimeter to fasten them to the body. (Don't place them too close to the bottom because you'll need an edge when you sew the back on.) You'll do the same basic thing with the beak.

For the skirt, I started with a 6" strip of material. You'll want it to be between 1 1/2 times the width of the owl to twice the width of the owl depending on how ruffled you want the skirt. With the strip I folded it in half hot dog style. by doing this is kept the pattern of the fabric on both sides rather than giving it a hem and having the fabric on 1 side. Next I inserted a basting seam along the top joining the 2 ends together. At first I tried a pleat, but the skirt is too short and it looked silly. Once I pulled tight gathering the fabric, I tied it off. Then I pinned the ruffle to where I wanted it on the owl. Then take it to your sewing machine and sew. Even though I thought I was being careful I still sewed it on a little crooked. :) oops!
After you sew the skirt on you'll need to attach the back of the body to the front.
1. Place the face of both the front and back of the owl together and sew. You might need to fold the skirt a little so as to not sew it into the seam. I didn't do that on this but have before. It's very frustrating to fix. When sewing them together make sure to leave a little hole so you can stuff it. I kept mine at the top by the ear because i'll be disguising it with the flower.
2. Then stuff away. Here is what it looks like laying down.

Once you have it stuffed as best you can sew down the side of the ear but not all the way closed yet. This way you'll be able to fill this ear before closing it completely. As you finish the seam keep adding an necessary stuffing to make sure it's nice and plush.

This is the little flower that I made for her "hair".
Lastly, I glued the flower up by the ear and voila! It's finished.
She's a lot quirky but I absolutely love how it turned out and is definitely a 1 of a Kind!

Photobucket

Curtain Add-On

I purchased these faux silk curtains from my local Wally World and had them in storage for the longest time. When I finally hung them up I had to hang them above the blinds casing since my rod holders weren't long enough to go around it. (I can't take them down because the stupid hard-working staff at the complex will charge me if I do. They think they'll be able to tell when I move out if I've taken them down and put them back up agian. I don't think so. Thus the 6" gap between the curtains and the floor. It looks terrible!
Need not fear! I have a sewing machine! I picked up this fabric at Hancock in their upholstery/drapery section and it was half off! It was perfect. The blue stripe even matches my new sofa and love seat!
A little CuTTing, pINning and SewINg later and VooaLAH!
My very own Custom curtains.
Sigh of relief! So much better!


Photobucket